最終更新日 2024-09-25
チュートリアル③ ~ウィンドウの見た目を整える~
概要
前節では、入力補完ウィンドウに合わせて、自作のウィンドウを表示しました。
しかし、それはただのグレーのウィンドウでした。
今回は入力補完の説明っぽい見た目のウィンドウへと昇格させませましょう。
それっぽいウィンドウ
#include <windows.h>

#include "OutputDebugStream.h"

using namespace System;
using namespace System::Drawing;
using namespace System::Windows::Forms;


public ref class ACHelpForm : public Form
{
public:
  static ACHelpForm^ f; // 自分自身の置き場

private:
  static String^ filename; // 現在のファイル名
  HWND hWnd;               // 入力補完ウィンドウハンドル
  Label^ label;            // 説明文用のラベル

private:
  static Timer^ timer;     // 描画調整用のタイマー
  int nTickRemainCnt;      // 描画調整用のカウンタ

public:
  ACHelpForm(String^ filename)
  {
    this->filename = filename;

    this->Visible = false;
    this->BackColor = System::Drawing::Color(::Color::White);

    SetFormAttr();

    label = gcnew Label();
    label->Top = 10;
    label->Left = 10;

    this->Controls->Add(label);
  }

public:
  void Update(HWND hWnd, int iListBoxSelectedIndex, String^ strListBoxSelectedItem, int iItemHeight)
  {
    this->hWnd = hWnd;
    this->SuspendLayout();
    AdjustToAutoComp();
    // フォームのサイズや位置を再配置

    // それに応じてラベルのサイズが決まる
    label->Width = this->Width - label->Left * 2;
    label->Height = this->Height - label->Top * 2;
    label->Font = gcnew System::Drawing::Font("MS 明朝", (float)iItemHeight*0.7f); // 1.5倍ぐらい

    label->Text = "ファイル名:" + filename + "\n" + strListBoxSelectedItem + "\n(実際にはstrから対応する辞書があれば、説明文を出す。)"; // ストリングを流し込み。
    this->ResumeLayout();

    CreateDelayTimer();
  }

protected:
  // 入力補完ウィンドウの右に、幅約2倍、高さ160pxへと自分自身を移動
  void AdjustToAutoComp()
  {
    RECT rect;
    GetWindowRect(this->hWnd, &rect);
    this->Left = rect.right + 24;
    this->Top = rect.top;
    this->Width = (rect.right - rect.left) * 2;
    this->Height = 160;

    DrawRectangle();
  }

  // フォームの外淵に沿って四角を描画
  void DrawRectangle()
  {
    Graphics^ g = this->CreateGraphics();
    Pen^ pen = gcnew Pen(::Color::Gray, 1);
    g->DrawRectangle(pen, 0, 0, this->Width - 1, this->Height - 1);
    delete pen;
    delete g;
  }

  // 入力補完などで状態が切り替わったら、6ミリx100回ぐらいはトライして、状態を追従し続ける。
  // 状態追従の安定化の一環
  void CreateDelayTimer()
  {
    if (timer) {
      timer->Stop();
    }

    timer = gcnew Timer();
    timer->Interval = 6;
    timer->Tick += gcnew EventHandler(this, &ACHelpForm::TimerTick);
    timer->Start();
    nTickRemainCnt = 100;
  }

  void TimerTick(Object^ sender, EventArgs^ e)
  {
    AdjustToAutoComp();

    if (true) { // 単語にが存在するならば…という条件に置き換えると良い
      this->Show();
    }
    else {
      this->Hide();
    }

    nTickRemainCnt--;
    if (nTickRemainCnt < 0) {
      timer->Stop();
    }
  }

public:
  void StopTimer()
  {
    if (timer) {
      timer->Stop();
    }
  }


protected:
  void SetFormAttr() {
    //タイトルバーを消す
    this->ControlBox = false;
    this->Text = "";
    this->FormBorderStyle = ::FormBorderStyle::None;
  }

  // フォーム表示時にアクティブにならないようにする
  property bool ShowWithoutActivation
  {
    virtual bool get() override
    {
      return true;
    }
  }

  // このフォームがクリックなどされた時にアクティブにならないようにする。
  virtual void WndProc(Message %m) override
  {
    if (m.Msg == WM_MOUSEACTIVATE)
    {
      m.Result = (IntPtr)MA_NOACTIVATE;
      return;
    }

    Form::WndProc(m);
  }

};


extern "C" __declspec(dllexport) int OnCreate(HWND hWnd, LPCTSTR szFileName) {

  // ウィンドウの作成
  if (ACHelpForm::f == nullptr || ACHelpForm::f->IsDisposed) {
    ACHelpForm::f = gcnew ACHelpForm(gcnew String(szFileName));
  }

  return TRUE;
}

extern "C" __declspec(dllexport) int OnListBoxSelectedIndexChanged(HWND hWnd, int iListBoxSelectedIndex, LPCTSTR szListBoxSelectedItem, int iItemHeight) {

  ACHelpForm::f->Update(hWnd, iListBoxSelectedIndex, gcnew String(szListBoxSelectedItem), iItemHeight);

  return TRUE;
}


extern "C" __declspec(dllexport) int OnDestroy(HWND hWnd) {

  // ウィンドウの破棄
  if (ACHelpForm::f) {
    ACHelpForm::f->StopTimer(); // タイマーを止める
    ACHelpForm::f->Close();
  }
  // このOnDestroyの後に、インスタンスが残っているのに任せるのは不安である。明示的に解放
  if (ACHelpForm::f) {
    OutputDebugString(L"明示解放\n");
    delete ACHelpForm::f;
  }

  return TRUE;

}
再度コンパイル
再度コンパイルし、「HmAutoCompleteExPlug.dll」を秀丸ディレクトリにコピーしましょう。
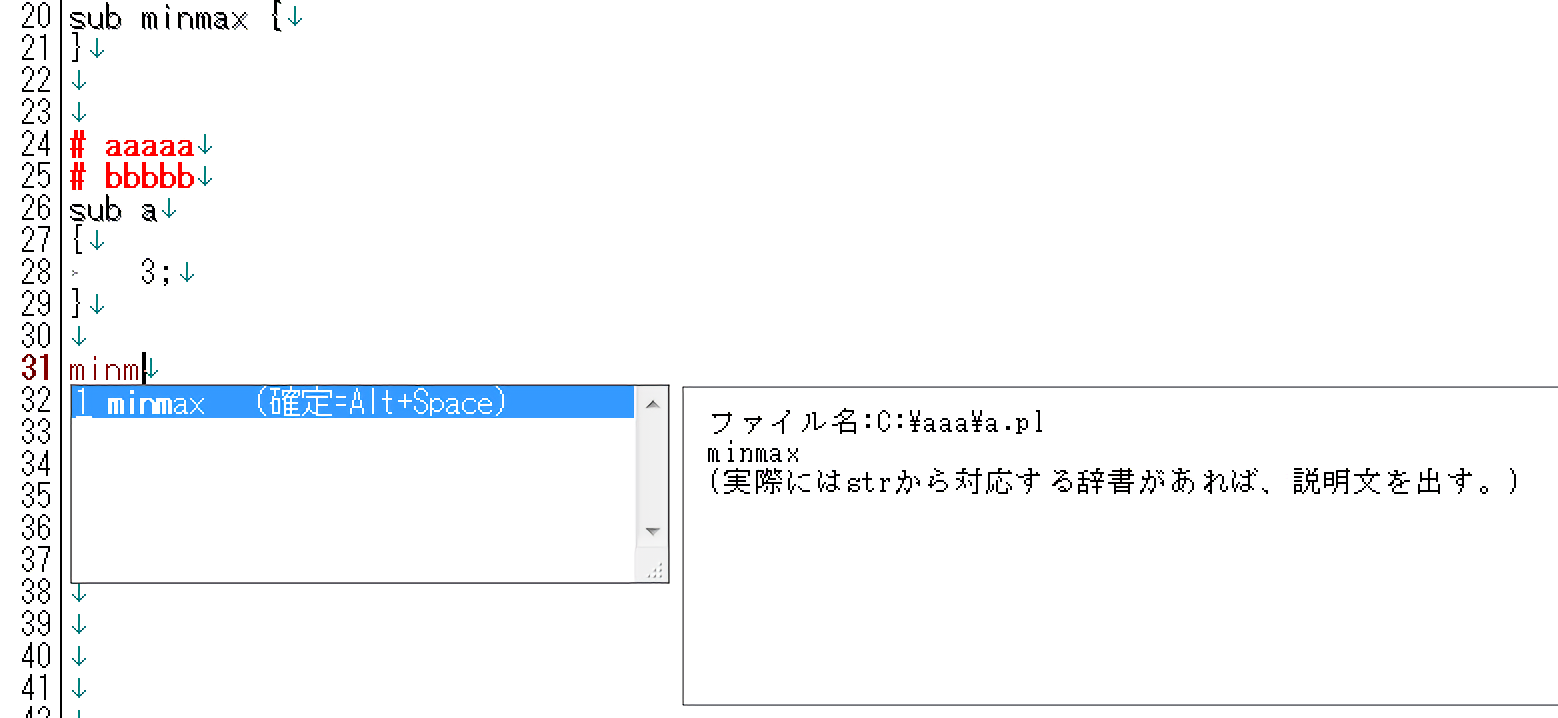
再び、.plファイルを読み込んで、何か入力補完を出し、単語を選択してみましょう。
以下のように、「それっぽい」ウィンドウが表示されたでしょうか。
解説
今回の要点は見た目を整えたことですが、
それ自体は、.NETの基本中の基本内容であり、
- Labelを配置して、ファイル名や単語名を表示する。
文字の大きさは、単語補完リストの「1項目の高さ」を基準にして割り出す。
- フォームの外にグレーで四角い矩形を描く
などです。特に解説の必要はないでしょう。
タイマーの導入
今回の注目ポイントはタイマーの導入です。
「入力補完の具体的な選択」を得てから「表示の更新」をするまでの間に、
「計0.6秒」程度の「更新をし続ける時間」を設けることで、
入力補完選択時の「ちょっと後(0.6秒以内」の時間差で「表示位置」や「表示内容」を変更したいといった
擬似非同期的な時間差更新を可能とする基盤を整えました。
  // 入力補完などで状態が切り替わったら、6ミリx100回ぐらいはトライして、状態を追従し続ける。
  // 状態追従の安定化の一環
  void CreateDelayTimer()
  {
    if (timer) {
      timer->Stop();
    }

    timer = gcnew Timer();
    timer->Interval = 6;
    timer->Tick += gcnew EventHandler(this, &ACHelpForm::TimerTick);
    timer->Start();
    nTickRemainCnt = 100;
  }

  void TimerTick(Object^ sender, EventArgs^ e)
  {
    AdjustToAutoComp();

    if (true) { // 将来「有効な単語説明文が存在するならば」…という条件に置き換えると良さそうだ
      this->Show();
    }
    else {
      this->Hide();
    }

    nTickRemainCnt--;
    if (nTickRemainCnt < 0) {
      timer->Stop();
    }
  }

public:
  void StopTimer()
  {
    if (timer) {
      timer->Stop();
    }
  }
Timerが加わったことで、フォームを閉じる前にタイマーを止めるのを忘れないようにしましょう。
extern "C" __declspec(dllexport) int OnDestroy(HWND hWnd) {

  // ウィンドウの破棄
  if (ACHelpForm::f) {
    ACHelpForm::f->StopTimer(); // タイマーを止める
    ACHelpForm::f->Close();
  }
  // このOnDestroyの後に、インスタンスが残っているのに任せるのは不安である。明示的に解放
  if (ACHelpForm::f) {
    OutputDebugString(L"明示解放\n");
    delete ACHelpForm::f;
  }

  return TRUE;

}